Recently, I was able to spend some time with the crew at Dixie 4-Wheel Drive in Moab, Utah, where we had a very unique opportunity—take six, bone-stock Jeep Wrangler Rubicons, six different manufacturer's lift kits, a whole lot of 37-inch tires, and install them to see how they would perform. This was such a cool experience and whole lot of fun, and I don't think anything like this has ever been done before.
I get asked all the time, “what’s the best lift kit for my Jeep?” The truth is, there is no right answer to that. Everybody has a unique need for how they use their vehicle. Maybe your Jeep is a daily-driver and you occasionally take it out on the weekends. Or maybe it's a hardcore rock-crawler and a dedicated weekends-only vehicle. It could be you enjoy hitting easy trails.
Other considerations include budget and whether you plan on doing the install yourself or you plan on paying someone else to do it. Honestly, there are a lot of factors that go into deciding on what the best lift kit is. Hopefully, by learning what I thought about these six different lift kits, you’ll be able to make an informed decision about the lift kit that's right for you.
I will say that choosing a lift kit from a reputable manufacturer known for making quality Jeep products is very important.
And now, on to the comparison!
To make sure the focus was truly on these six unique lift kits, the crew at Dixie 4-Wheel Drive equipped each Jeep the same 37-inch tires. I want to emphasize that this was not an apples-to-apples comparison—these lift kits differed from one another in more ways than one, including their height, price, and ease (or lack thereof) of installation.
Some of the lift kits were 2", while others were 2.5", 3", and some even 4". Some of them were quick and easy to install, while some will end up being a little more complicated. Some were reasonably priced and others, not so much. But all of these factors were an important part of this comparison because what you want your Jeep to be capable of and what your budget is for making that happen is going to be different, sometime very different, from someone else.
Now, let’s take a look at the six lift kits we installed.
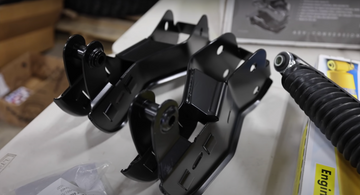
This system is an impressive bolt-on, comprehensive suspension kit that includes triple-rate coil springs, front and rear 2.25 RRD spec shocks, all new adjustable upper and lower front and rear control arms, front and rear adjustable track bars—to help ensure you can keep your axle centered—sway bar links, spring correction pads, a track bar relocation bracket, and bump stops.
This kit was designed for Rubicon owners who want maximum articulation from a mid-arm lift with excellent highway ride and improved off-road ability. No hard copy instructions were provided in this box, but there was a card with a QR code to download the instructions. The online instructions were solid—they provided some nice details with good color pictures.
The install was easy work for the Dixie team, but if someone was to do this kit in their own garage, it would probably take them two or three days—the better part of a long weekend—because it is such a comprehensive kit.
The manufacturer provided solid information about the required measurements of all the adjustable components, which was great. One unique thing about the Rock Krawler kit is that it is recommended you drill a hole on top of both front control arm brackets so you can face the Zerk fitting upward and make it easier to service. We used a plasma cutter, but a simple metal hole saw would work just fine.
According to Bryce at Dixie 4-Wheel Drive, it's better to have the Zerk fitting pointed up instead of down so they don't hit a rock and get damaged. In this case, Rock Krawler calls for a hole saw cut out to clear their jam nut and Zerk fitting. We measured to see how far down the shock fully extended. Structurally speaking, it remained solid after we made the cut-out, which was important since these Jeeps were going to be used pretty hard.
One of the details I like about the Rock Krawler kit is the puck style bump stops. To use these, you do have to drill a larger hole in each perch, but having the ability to add and remove pucks to adjust your bump stop is a cool feature that I really liked.
The only minor hiccup we encountered during this entire install was that the supplied Zerk fittings were the wrong size. Luckily, the guys at Dixie had a full box on hand.
All in all, the Rock Krawler kit was solid, well-constructed, and the installation was fairly straightforward.
This kit offers dual rate springs, both front and rear. What I really like is that each spring is clearly labeled, as they are tuned for each corner of the vehicle. The dual rate springs come with an initial soft rate that absorbs small bumps, and a firmer secondary rate to help soak up those larger impacts.
Also included are eight Johnny-joint control arms, front and rear track bars, front and rear bump stops, and—what sets this kit apart from the rest—a front and rear anti-rock sway bar kit. The anti-rock is a very popular option for many off-roaders because it gives you good on-road stability, but when you hit the trails you don’t have to manually disconnect anything.
The shocks are not included with this kit and Rock Jock recommends pairing them up with either some King shocks or the Fox shocks, which are the ones we used, both of which are specked for this 4” lift.
The instructions that came with the kit were great, with lots of details and pictures. I’m a stickler for straightforward, easy-to-follow instructions and Rock Jock got it right.
The installation went really well. There was no cutting required for this kit and the only slight bit of custom work required was to drill and tap the bump stop purchase. The control arms, springs, and track bars were installed with no issues.
The anti-rock sway bars did add extra time to this install because we first needed to remove the front and rear sway bars, and then install the anti-rocks. We had a slight challenge on the rear, getting the anti-rock bushing to fit, but a little grinding of both the bushing and the Jeep, with a little grease (and some good motivation) and they finally went in. The front bolted right up with no issues.
Both this Rock Jock kit and the Rock Krawler kit have eight-arm control arm links, which means if you’re going to install this in your garage, you'll spend a little more time doing that. If you opt to pay someone to do the install for you, it’s going to cost you around 10 hours of labor. This is important to keep in mind when you’re factoring in the budget for your lift kit.
Once we got the wheels on with this kit, we did run into a problem. With the wheel and tire combo we’re using, we had a significant amount of rub on the anti-rock. The manufacturer of this kit, as well as a few others in our comparison, recommended a different back spacing than the wheels we are using.
This system is designed to offer true street and trail performance. The kit comes with front and rear coil springs, front control arm drop brackets—which help restore caster on taller lifts—and Teraflex states these are built to take a hit.
The kit comes with the Falcon 3.3 shocks, which are the only adjustable shocks in this comparison. Also included were some new progressive bump stops with shims that allow you to fine tune your bump stop. There are front and rear track bar relocation brackets, new sway bar links, a rear drop pad, and something that I’m a fan of, front brake line anchors.
Now, I’m going to make a very bold statement here. Teraflex, hands down, has the best instructions in this comparison. Honestly, out of any component I’ve ever installed on my Jeep, no one has ever had instructions that are this detailed and easy to read.
The kit bolted right up with no problems and only a little bit of drilling was required for the front and rear track bar brackets. The front control arm drop brackets bolted right in but took a little wiggling to get the holes lined up. The guys had to cut some holes in the plastic to fit the shocks, but Teraflex included a template which made it a very easy process.
Compared to the first two kits that we installed, this one took less time by several hours.
This kit is AEV’s expedition ready suspension. It’s engineered to handle the load capacity and maintain the ride quality for those setting off on long treks and carrying heavy cargo loads.
The springs are triple-rated coils and I like that they’re not black because it lets everybody know that there’s something a little different going on with your suspension. They are paired with Bilstein 5100 shocks that have a slightly firmer and sportier feel than stock.
The kit provides a pair of stamped control arm geometry brackets, a rear track bar tower extension, extended front and rear sway bar links, front and rear bump stops, and two special items included in this kit—the ProCal Snap, which allows you to recalibrate your speedometer, and the Jeep JL jack base, which works with your factory scissor jack and is nice to have if you run larger tires.
The instructions can be downloaded on their website and are very good with nice details and diagrams that are easy to follow. The AEV instructions were my second favorite out of the entire group.
Because AEV and Teraflex are the only two kits in this comparison that offered the front control arm geometry correction brackets, I put them side to side just to see how different they were. The one from AEV is stamped steel and the Teraflex one is made of steel pieces that are welded together. I think they’re both very solid but, just by picking them up, the Teraflex felt a little more substantial.
Installing the AEV kit was a very straightforward process. There was no drilling or cutting with this kit and everything bolted right up. I like this because if you want to make any changes in the future, you can easily revert back to your stock components or use new components that don’t have to be re-modified to fit the modifications you’ve already made. This kit could easily be installed in an afternoon in your garage with some basic hand tools.
This Icon lift kit was designed for the driver looking to improve both on and off-road performance and ride quality. This kit includes dual-rate springs, aluminum body 2.0 shocks that are fully serviceable, bump stop spaces, sway bar link, and all the necessary hardware.
This kit is Icon’s most basic lift kit package but because they offer eight total stages of lift systems you can use this as the beginning foundation and upgrade using their other stage components over time.
There was nothing difficult about this installation. The springs, shocks, bump stops, and links went on with no trouble. The directions were adequate and everything was a straightforward bolt-on process that really didn’t take very long.
One of the little things about this kit that I immediately appreciated, being prior military, was that it comes in this old-style c-bag. I really liked this and might have taken the bag back home with me after the comparison.
Dynatrac engineered this kit to have a better ride quality, handling, and stability than factory, and to be a good fit for everyday family use and weekend off-road treks.
Included in the kit are four new coil springs, Fox 2.0 performance series aluminum body shocks (exclusively valved for this suspension), brake line extensions, bump stops, and sway bar end links.
While this is only a 2” lift, Dynatrac states that the Jeep JL Rubicon can still run 37” tires with zero cutting required.
Even though there are only a few components to this kit, Dynatrac still provided nine pages of instructions, which was very helpful. This kit should only take about four hours to install with some basic hand tools, but the guys at Dixie 4-Wheel Drive blasted through, installing the springs, shocks, bump stops, and brake line bracket in no time. This is a simple, no cutting, bolt-on kit.
Off-Road Measurements
The first measurement we took was the overall lift each Jeep gained with the new lift kit over stock. This was determined measuring from the shock top bolt eyelet to the bottom bolt eyelet on the ground and on each corner, to give a true number increase over stock. This does not include the gain received with the 37” tires. This is just the gain from the suspension lift.
Using the shock bolt as a fixed measurement point prevents any discrepancies that may come from the tires. Here are the measurement results:
No surprise that the Rock Jock lift was the tallest, but I think it was very interesting that both the AEV and Icon kits, which are 2.5” systems, both measure out equal to or higher than the 3.5” lift kits in this category.
Now I know that AEV intentionally runs their kits a little taller because they expect those using it for expeditions will add a heavier load on their Jeep, but I was surprised that the Icon kit measured the second tallest out of the group.
I think these are important numbers to look at if height is a factor in your decision-making.
Things to consider when deciding how high you want to go include: Will your Jeep still fit in the garage with a roof rack? Will getting in and out of your daily driver Jeep be difficult?
When you look at all the Jeeps next to each other, the overall differences are subtle. But they are notably tall than any stock Jeep. The stance on each of these Jeeps looks great and there's just enough lift to fill out that 37” tire in the wheel well.
Flex Measurements
I found the flex numbers very interesting. This was just a straight bottom of the tire to ground measurement at full flex from each corner of the Jeep with three other tires still barely touching the ground. Here are the results:
I really expected Rock Jock to come out on top here but I wonder if the shock length was the limiting factor keeping this from its full potential. Rock Krawler crushed the competition and again, Icon, the 2.5” lift, was number two on our measurement scale.